はじめに
前編では、Baculaのバックアップサーバーとクライアントの構築と基本設定について解説しました。後編では、リモートバックアップとリストアの方法について解説します。
メディアセットアップ
バックアップを実行するためには、バックアップメディアが必要です。今回は、ファイルシステムをバックアップアップメディアとしてセットアップします。
1.Bacula Consoleの起動
Consoleを起動すると、Directorに接続した後、*(アスタリスク)のコマンドプロンプトが表示されます。
$ sudo bconsole
2.labelコマンドの実行
labelコマンドを実行すると、Catalogに指定されたStorageが自動検出され、FileStorageが選択された後、ボリューム名の入力待ちになりますので、任意のボリューム名を入力します。
ここでは、file1としています。
*label
3.Pool指定
ボリューム名を入力すると、定義済みのPool名が表示されますので、Fileを選択します。
選択すると、指定したボリューム名のメディアが作成されます。
[vagrant@bacula-server ~]$ sudo bconsole
Connecting to Director localhost:9101
1000 OK: bacula-dir Version: 5.0.0 (26 January 2010)
Enter a period to cancel a command.
*label
Automatically selected Catalog: MyCatalog
Using Catalog "MyCatalog"
Automatically selected Storage: File
Enter new Volume name: file1
Defined Pools:
     1: Default
     2: File
     3: Scratch
Select the Pool (1-3): 2
Connecting to Storage daemon File at 192.168.0.50:9103 ...
Sending label command for Volume "file1" Slot 0 ...
3000 OK label. VolBytes=209 DVD=0 Volume="file1" Device="FileStorage" (/mybackup)
Catalog record for Volume "file1", Slot 0  successfully created.
Requesting to mount FileStorage ...
3906 File device "FileStorage" (/mybackup) is always mounted.
Consoleを終了し、バックアップフォルダを確認すると、指定したメディアが作成されています。

以上で、メディアセットアップは終了です。
バックアップジョブの定義
インストールされたデフォルトのバックアップジョブが既に定義されていますが、ここではバックアップジョブの定義を行い、設定のポイントについて解説します。
なお、後編で行う作業は、全てDirector設定ファイルに対して行います。
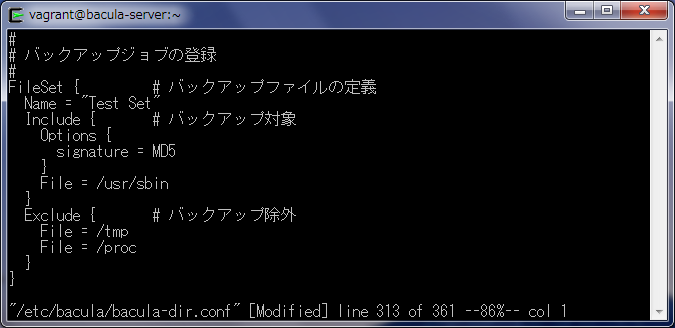
1.FileSetの定義
FileSetは、バックアップ対象ファイルおよび、除外ファイルを指定します。
Includedで、対象ファイルを、Excludeで、除外ファイルを指定できます。
2.JobDefsの定義
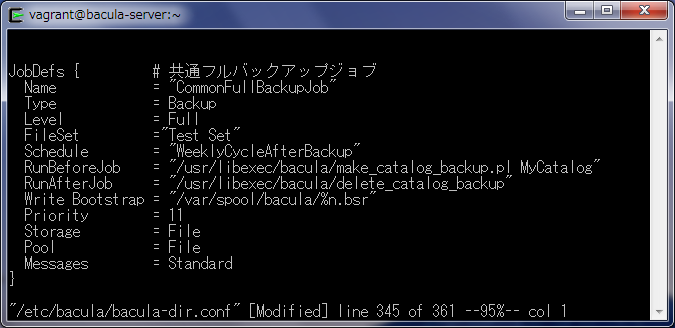
JobDefsは、バックアップ対象サーバーに共通するバックアップジョブを指定します。
Jobの定義では、Level/FileSet/Storage/Poolの指定がポイントとなります。
3.Jobの定義
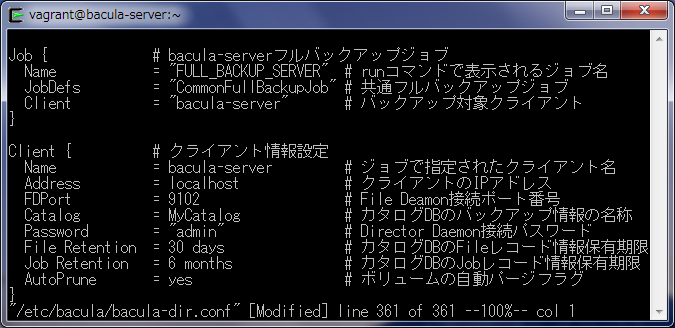
Jobは、バックアップ対象サーバーの情報を定義します。
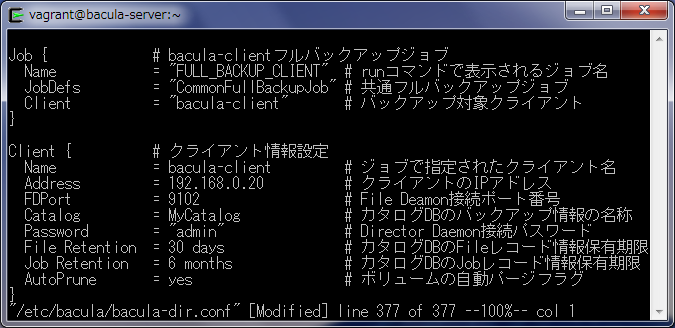
ここでは、ジョブ名、共通ジョブ名、クライアント名を定義します。
4.Clientの定義
Jobで定義したクライアントに関する情報を定義します。
クライアント名、IPアドレスの指定が必要です。
5.Directorの再起動
Director設定ファイルの編集が終了したら、Directorを再起動します。
$ sudo service bacula-dir restart

バックアップジョブの実行
バックアップジョブを定義しましたので、ジョブを実行します。
1.Bacula Consoleの起動
$ sudo bconsole
2.runコマンドの実行
Consoleのコマンドプロンプトから、runコマンドを実行します。
*run
3.定義済みジョブの実行
runコマンドを実行すると、Directorに登録されたジョブが表示されますので、実行したいジョブを選択します。
選択すると、ジョブがキューイングされ、しばらくするとバックアップジョブが実行されます。
[vagrant@bacula-server ~]$ sudo bconsole
Connecting to Director localhost:9101
1000 OK: bacula-dir Version: 5.0.0 (26 January 2010)
Enter a period to cancel a command.
*run
Automatically selected Catalog: MyCatalog
Using Catalog "MyCatalog"
A job name must be specified.
The defined Job resources are:
     1: BackupClient1
     2: BackupCatalog
     3: RestoreFiles
     4: FULL_BACKUP_SERVER
Select Job resource (1-4): 4
Run Backup job
JobName:  FULL_BACKUP_SERVER
Level:    Full
Client:   bacula-server
FileSet:  Test Set
Pool:     File (From Job resource)
Storage:  File (From Job resource)
When:     2014-02-08 16:17:26
Priority: 11
OK to run? (yes/mod/no): yes
Job queued. JobId=3
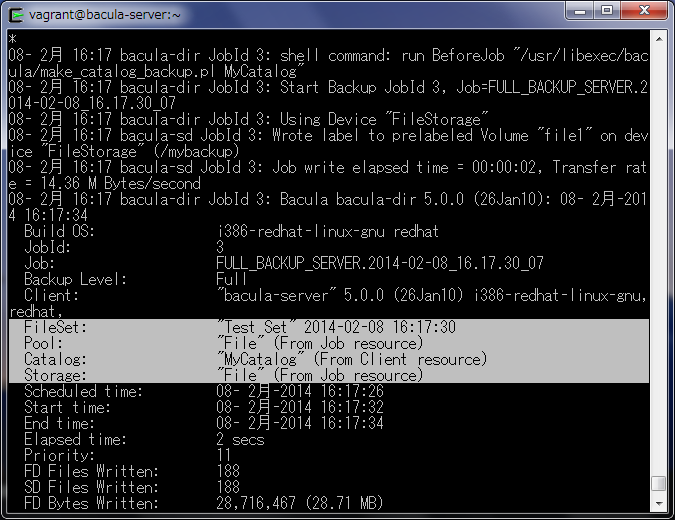
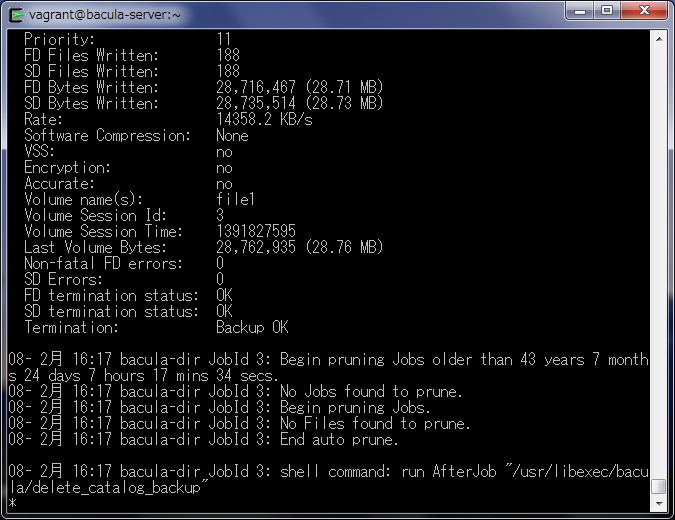
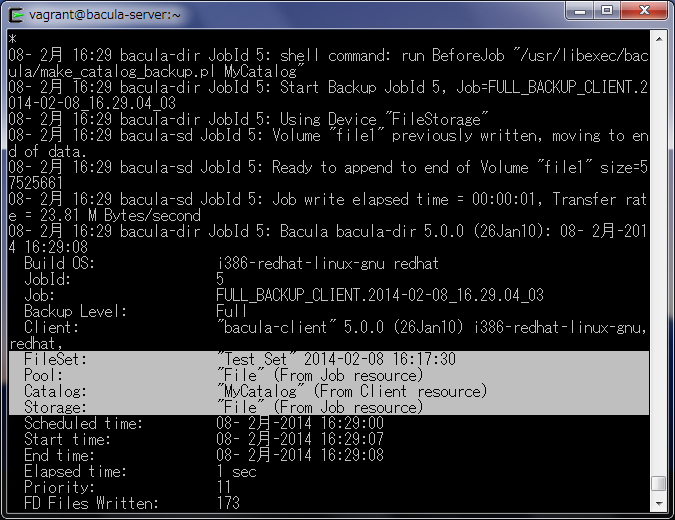
Consoleに表示されたログ上で、実行したCatalog/Storage/Pool/FileSetなどが確認できます。
4.リモートバックアップの実行
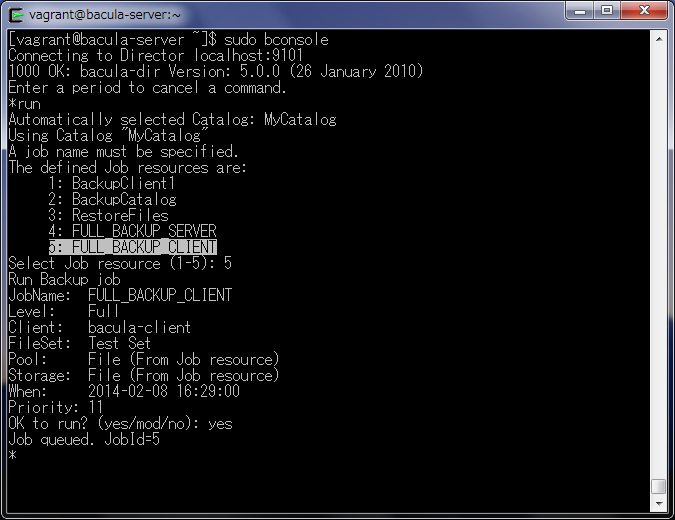
これまでの手順で、Baculaクライアントのリモートバックアップを行います。
Jobの定義

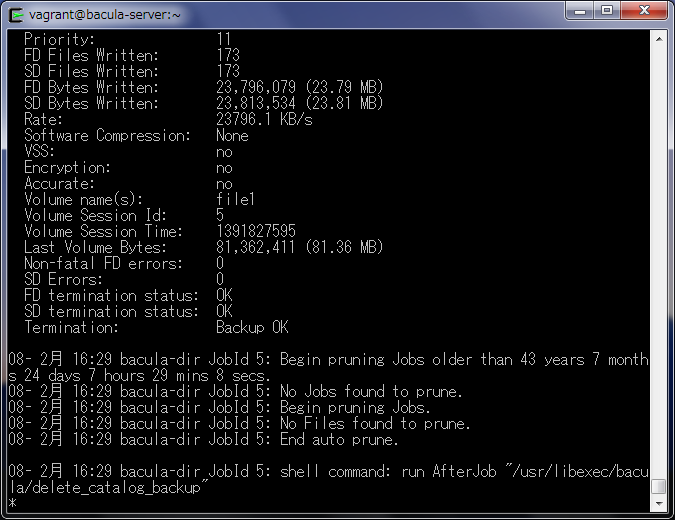
リストアジョブの定義
作成したFileSetをリストアするジョブを定義します。
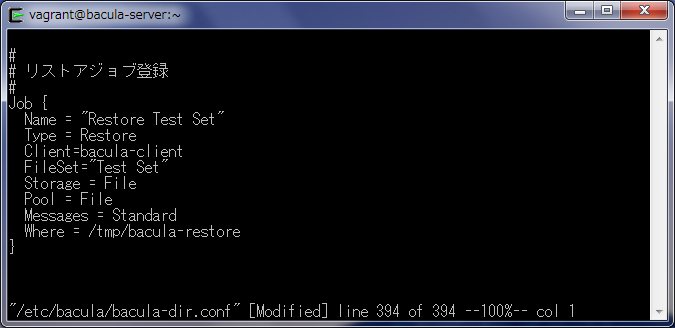
1.Jobの定義
定義済みのStorage/Pool/FileSetおよび、Clientを指定し、リストアの場所を指定します。
2.Directorの再起動
$ sudo service bacula-dir restart

リストアジョブの実行
バックアップしたメディアから、リストアを行います。
リストアは、Baculaクライアントで実行するため、クライアントには、File Daemonおよび、Bacula Consoleがインストールされ、Baculaサーバーと接続できることが必須となります。
このため、ディザスターリカバリやハードウェア障害からのリカバリを行うためには、上記の環境を構築した後、またはシステムリカバリツールなどで基本システムを復旧した後に、リストアする必要があります。
1.Bacula Consoleの起動
$ sudo bconsole
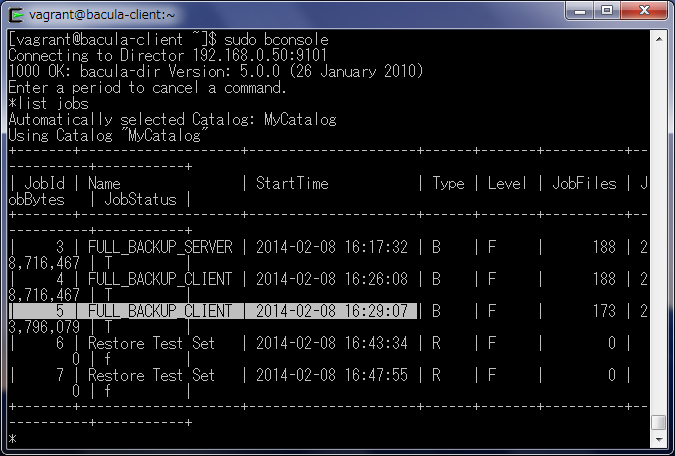
2.最新バックアップの確認
リストアするクライアントの最新バックアップを確認します。
JobId: 5が最新だと確認できます。
*list jobs
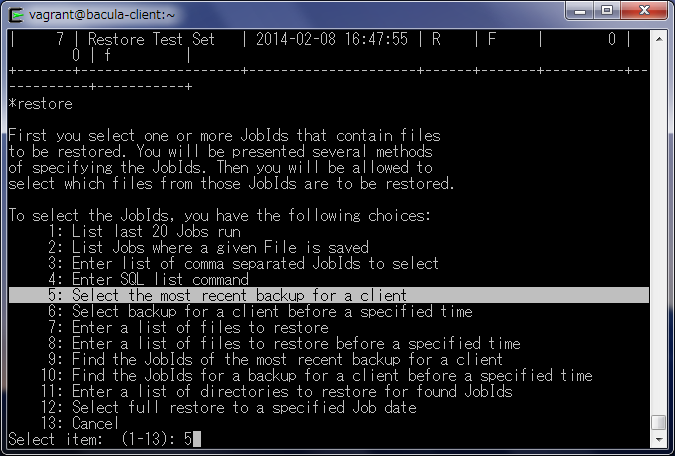
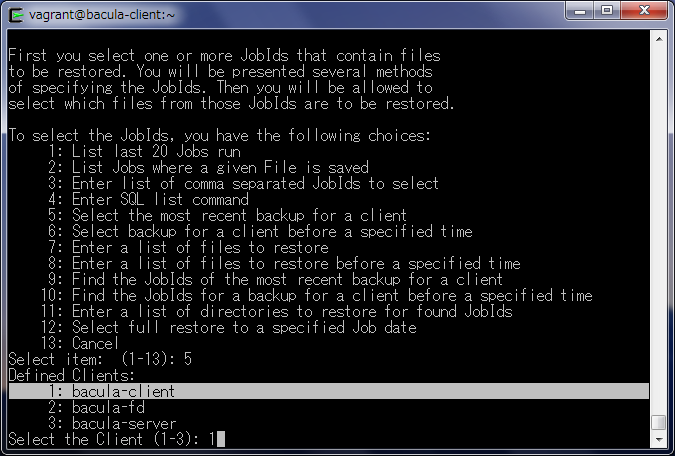
3.restoreコマンドの実行
*restore
実行すると、Jobメニューが表示されますので、5:Select the most recent backup for a client
を選択します。
4.リストアするクライアントの選択
登録済みのクライアントがリストされますので、リストアするクライアントを選択します。
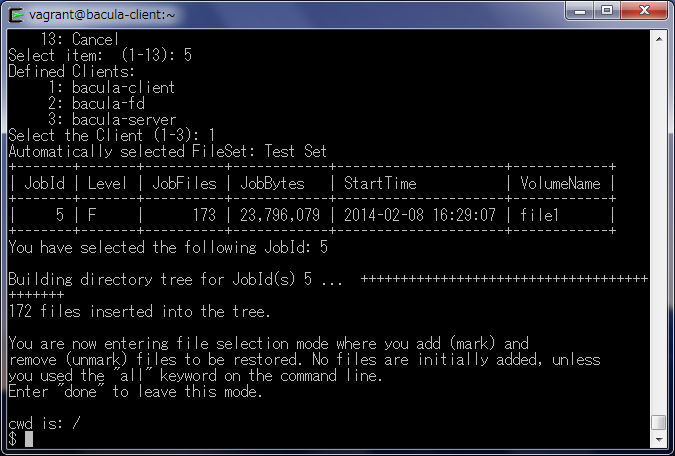
5.リストアするファイルの選択
最新のバックアップメディアが、一時フォルダにリストアされた後、リストアするファイルを選択する$プロンプトが表示されます。
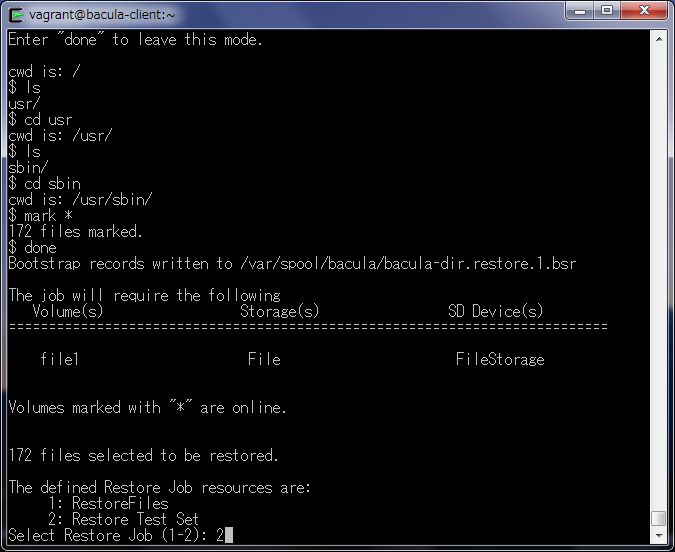
mark *(アスタリスク)により、ファイルをマークし、doneを入力するとマーク指定が終了します。
6.リストアジョブの選択
マーク指定が終了すると、定義済みのリストアジョブが表示されますので、バックアップメディアに対応したリストアジョブを選択します。
7.ジョブの実行確認
選択されたリストアジョブのリストア先、バックアップされたクライアント情報などが表示され、実行確認をされますので、yesを入力するとジョブがキューイングされます。
The job will require the following
   Volume(s)                 Storage(s)                SD Device(s)
===========================================================================

    file1                     File                      FileStorage

Volumes marked with "*" are online.


172 files selected to be restored.

The defined Restore Job resources are:
     1: RestoreFiles
     2: Restore Test Set
Select Restore Job (1-2): 2
Run Restore job
JobName:         Restore Test Set
Bootstrap:       /var/spool/bacula/bacula-dir.restore.1.bsr
Where:           /tmp/bacula-restore
Replace:         always
FileSet:         Test Set
Backup Client:   bacula-client
Restore Client:  bacula-client
Storage:         File
When:            2014-02-08 17:20:03
Catalog:         MyCatalog
Priority:        10
Plugin Options:  *None*
OK to run? (yes/mod/no): yes
Job queued. JobId=8
8.リストアの実行
しばらくするとリストアジョブが実行されます。
OK to run? (yes/mod/no): yes
Job queued. JobId=8
*
08- 2月 17:20 bacula-dir JobId 8: Start Restore Job Restore_Test_Set.2014-02-08_17.20.35_15
08- 2月 17:20 bacula-dir JobId 8: Using Device "FileStorage"
08- 2月 17:20 bacula-sd JobId 8: Ready to read from volume "file1" on device "FileStorage" (/mybackup).
08- 2月 17:20 bacula-sd JobId 8: Forward spacing Volume "file1" to file:block 0:57525661.
08- 2月 17:20 bacula-dir JobId 8: Bacula bacula-dir 5.0.0 (26Jan10): 08- 2月-2014 17:20:38
  Build OS:               i386-redhat-linux-gnu redhat
  JobId:                  8
  Job:                    Restore_Test_Set.2014-02-08_17.20.35_15
  Restore Client:         bacula-client
  Start time:             08- 2月-2014 17:20:37
  End time:               08- 2月-2014 17:20:38
  Files Expected:         172
  Files Restored:         172
  Bytes Restored:         23,796,079
  Rate:                   23796.1 KB/s
  FD Errors:              0
  FD termination status:  OK
  SD termination status:  OK
  Termination:            Restore OK

08- 2月 17:20 bacula-dir JobId 8: Begin pruning Jobs older than 43 years 7 months 24 days 8 hours 20 mins 38 secs.
08- 2月 17:20 bacula-dir JobId 8: No Jobs found to prune.
08- 2月 17:20 bacula-dir JobId 8: Begin pruning Jobs.
08- 2月 17:20 bacula-dir JobId 8: No Files found to prune.
08- 2月 17:20 bacula-dir JobId 8: End auto prune.
9.リストア先の確認
リストアが成功したらConsoleを終了し、実行したリストアジョブで定義したリストア先を確認します。
[vagrant@bacula-client ~]$ sudo ls /tmp/bacula-restore/usr/sbin
VBoxService              httpd.event                 rpc.mountd
addgnupghome             httpd.worker                rpc.nfsd
adduser                  httxt2dbm                   rpc.svcgssd
alternatives             hwclock                     rpcdebug
anacron                  iconvconfig                 rpcinfo
apachectl                iconvconfig.i686            rtacct
applygnupgdefaults       lchage                      rtcwake
arpd                     ldattach                    run_init
arping                   lgroupadd                   saslauthd
authconfig               lgroupdel                   sasldblistusers2
authconfig-tui           lgroupmod                   saslpasswd2
avcstat                  lid                         selinuxconlist
bacula                   lnewusers                   selinuxdefcon
bacula-fd                lnstat                      selinuxenabled
bconsole                 load_policy                 semodule
brctl                    logrotate                   sendmail
bsmtp                    lokkit                      sendmail.postfix
btraceback               lpasswd                     sestatus
build-locale-archive     luseradd                    setcap
cacertdir_rehash         luserdel                    setenforce
cache_check              lusermod                    setsebool
cache_dump               matchpathcon                showmount
cache_repair             mkdict                      sim_server
cache_restore            mklost+found                sm-notify
capsh                    mksock                      smtp-sink
chpasswd                 mountstats                  smtp-source
chroot                   newusers                    ss
clockdiff                nfsidmap                    sserver
cracklib-check           nfsiostat                   sshd
cracklib-format          nfsstat                     start-statd
cracklib-packer          nstat                       suexec
cracklib-unpacker        open_init_pty               sys-unconfig
create-cracklib-dict     packer                      t1libconfig
crond                    ping6                       testsaslauthd
dkms                     pluginviewer                thin_check
e2freefrag               plymouth-set-default-theme  thin_dump
efibootmgr               postalias                   thin_metadata_size
ethtool                  postcat                     thin_repair
exportfs                 postconf                    thin_restore
fdformat                 postdrop                    thin_rmap
filefrag                 postfix                     togglesebool
genhomedircon            postkick                    tracepath
getcap                   postlock                    tracepath6
getenforce               postlog                     tunelp
getpcaps                 postmap                     tzdata-update
getsebool                postmulti                   update-alternatives
glibc_post_upgrade.i686  postqueue                   useradd
groupadd                 postsuper                   userdel
groupdel                 pwck                        usermod
groupmems                pwconv                      usernetctl
groupmod                 pwunconv                    uuserver
grpck                    raid-check                  vbox-greeter
grpconv                  readprofile                 vigr
grpunconv                restorecond                 vipw
gss-server               rotatelogs                  visudo
htcacheclean             rpc.gssd                    zdump
httpd                    rpc.idmapd                  zic
以上で、リストアは終了です。
まとめ
ここまで、バックアップおよび、リストア方法について解説しました。解説した内容は、Baculaの機能の一部分だけです。この記事を参考にして、Baculaを用いた実践的なバックアップ・リストアを実践しましょう。
本ブログは、Git / Subversion のクラウド型ホスティングサービス「tracpath(トラックパス)」を提供している株式会社オープングルーヴが運営しています。
開発の効率化をしたい!もっと便利なツールを使いたい!そんなお悩みをtracpathで解決!
「tracpath(トラックパス)」は、企業内の情報システム部門や、ソフトウェア開発・アプリケーション開発チームに対して、開発の効率化を支援し、品質向上を実現します。
さらに、システム運用の効率化・自動化支援サービスも提供しています。
”つくる情熱を支えるサービス”を提供し、まるで専属のインフラエンジニアのように、あなたのチームを支えていきます。






No Comments